Earlier this week I shared with you the Sip N See I hosted with my sister's friend for my niece, Makoy. During the event, all of the guests created a single square on a canvas (I spray painted the whole thing light pink first). My sister chose four colors (light pink, hot pink, grey and white) that matched the room decor and I taped off 18 squares. Each party guest was asked to paint one square. Many people were concerned at first since they felt they were "not creative" or "couldn't draw." But as you can see, some of the more simple designs worked the best. We had a few squares left over so we made a foot print of Makoy's foot and each boy added his hand print. It turned out so cute.
A blog that follows my crafty, not artsy adventures. Things I craft, parties I throw and events and things that inspire me.
Thursday, May 30, 2013
Tuesday, May 28, 2013
Sip N See
My sister recently had her third child. Since she had two boys at home (3.5 and 5 years old), she decided to not find out the sex prior to the delivery. For 9 months we all assumed she would have another boy (her husband is one of 4 boys). But on April 8, she surprised and delighted us all with a sweet baby girl. When my brother in law walked into the waiting room to share with us he said "no balls" with tears in his eyes.
Because she was not sure what she was having, my sister decided to have a Sip N See if it was a girl. A good friend of hers was planning it and asked me to assist. My sister had decided the theme would be PINK. Every shade and everywhere. When you have two boys and are blessed to get a girl you want lots of pink!
I contributed the daisy cut mason jars. This was their coming out party and they were so cute. I bought them for my son's 3rd birthday party and then decided I would be sad if they were broken so decided against using them. Even my brother-in-law stopped and asked about them. The hot pink striped straws were adorable inside.
I also made the pink-chocolate dipped marshmallows. I was inspired by a post on pinterest (follow me here http://pinterest.com/aedepp/). The marshmellows turned out so cute. I did a mix of regular and jumbo sized marshmallows. I found the glass container at IKEA and we added the cotton candy that my sister's friend had brought. It was very Dr Seuss looking. The dessert table included lots of candy and gorgeous cupcakes made by another friend that was displayed in a vintage holder with real flowers. An amazing center piece and a trick I will steal for the future.
The decorations were adorable. We made and hung already made tissue paper poofs and lanterns as well as crepe paper over the windows and lots of pink balloons. Lunch was super easy with pre made chicken salad sandwiches, pink fruit kabobs and pink popcorn.
We also set up a canvas for guests to paint a square for Makoy. Later this week, I will post a how to of this great project. It turned out super cute.
The shower was a huge success and everyone had a blast. And Miss Makoy enjoyed being held by everyone who came to Sip N See her.
Thursday, May 23, 2013
Cupcakes and Friends
This past weekend I hosted a cupcake decorating play date for the pre-school set. My son is friends with a lot of great kids and we couldn't include everyone for this type of event, so I decided to go with inviting only girls. Girls at this age seem to be able to sit and concentrate longer. This also enabled me to do a pink cupcake theme (also my son's favorite color).
I was inspired by a recent visit to Duff's CakeMix (http://www.duffscakemix.com) here in LA. Duff's CakeMix is an awesome place (but super expensive) where you can decorate cupcakes (8 for $60) or a small cake. You choose your frosting colors, toppings and fondant and then decorate. For a 3.5 year old, this meant 20 min of fun and then done.
For our party we invited three girlfriends over and I set up the decorating in the dining room. Each child was given 3 chocolate cupcakes (Martha Stewart's Devil's Food Chocolate) and 3 vanilla cupcakes (vanilla champagne), four toppins (m&ms, colored sprinkles, blue round balls, and hot pink sprinkles). I then provided four brightly colored frostings (all butter cream with food coloring).
The kids had the best time decorating. It was so much fun to watch how each child decorates. My son of course did the pump and dump - pump on frosting (or ask mom to do it) and then dump the toppings. He also ate the m&ms (faster than they were placed on the cupcake). Our friend G took her time placing each sprinkle on individually.
The results were fantastic. Each child had a cupcake to eat, one for the parent and the last four were packaged in cute cupcake boxes to take home. As each child ate their cupcake (from top to bottom) they would stop and say they were finished when they had just the cake part left. I was quick to introduce a second decorating option and then the cupcake was devoured.
Monday, May 20, 2013
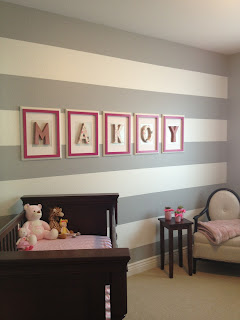
Wall Art
Since my last post included the picture of the succulent garden in my nieces room, I decided the second post should be the wall art. This was such a fun craft project. It all started with my obsession around letters and names. When I had my son, I wanted his name on everything. When I changed his baby room to a big boy room, I was inspired by the Serena and Lily picture below (I will post the room transformation at a later date).
I am so proud of these letters. They turned out gorgeous and really made the room.
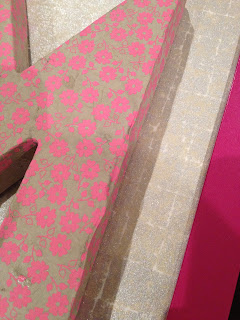
To combine my love of pink and letters, I decided to Mod Podge letters for my sister's Sip N See (another post to come on this too). At the same time, I was working on framed wall art for my own bedroom (yep, another post to come). Once I had done the letters in different pink and grey paper (purchased from Paper Source - between $6 and $11 per sheet), I realized they would look so cute glued to the white frames.
I added a nice silver and gold paper and thought I was done. My sister wanted more pink for the grey and white room. When I saw how muted the letters on the white frames were, I decided to get pink frames (frames fom IKEA, white $11.99 and pink $3.99). The pink frames were too thin, so I decided to layer the frames. After framing the paper and removing the glass (too heavy), I hot glue gunned the letters to the paper and then glued the pink frame to the white frame. And viola! Gorgeous wall art.
Wednesday, May 15, 2013
Mason Jar Succulent Gardens
I am so excitd to post my first blog. I have decided to start a blog to track and share all of the craft, not artsy things I do and see. I am currently obssessed with PINK, thanks to my brand new niece, and SUCCULENT GARDENS. More on the second part later.
I started by spray painting the mason jars. I purchased various sizes of mason jars at Walmart. I also saw them being sold at Micheals. Not sure which is cheaper. I love the smaller ones for this project but the two sizes looked best together. I used Kyrlon spray paint and in moments they were done. I then filled the jars with potting soil and added a succulent from Loews (4 pack for $3.99). I topped it off with soil and moss for a cute look and added a hot pink bow. ADORABLE. These are perfect for my nieces bedroom.
I started by spray painting the mason jars. I purchased various sizes of mason jars at Walmart. I also saw them being sold at Micheals. Not sure which is cheaper. I love the smaller ones for this project but the two sizes looked best together. I used Kyrlon spray paint and in moments they were done. I then filled the jars with potting soil and added a succulent from Loews (4 pack for $3.99). I topped it off with soil and moss for a cute look and added a hot pink bow. ADORABLE. These are perfect for my nieces bedroom.
(Gardens can be seen on table by chair. Wall art post to come.)
My obsession with SUCCULENT gardens started last year when I attended the Crafting Community weekend event at The Ace Hotel. Karen Kimmel and Crafting Community throw an amazing event and one of the activities was making succulent gardens in mason jars. My son loved placing the dirt in the jar and I still have it sitting on my window sill in the kitchen. We then decided to make these this year for all of his teachers as a teacher appreciation gift. Wow was it fun! What 3.5 year old doesn't love dirt.
Subscribe to:
Posts (Atom)


